The other day I was looking at an online site and came across a picture of a mermaid blanket. My little one was peering over my shoulder and instantly fell in love. I loved the idea but not the price and decided to sew my own version of a mermaid tail blanket. It only took about an hour to stitch up and Tate thinks it’s perfectly fabulous and seaworthy!

In order to avoid finishing seams, I stitched this mermaid blanket from fleece. I chose blue since it’s one of Tate’s favorite colors but a mermaid blanket would be adorable in any color.
How to Make a DIY Mermaid Tail Blanket
To make one, you’ll need one long piece cut {see below} on the fold. Be sure this piece is long enough to fit your child from the chest to the feet plus a bit extra and wide enough to easily slide into and still have some wiggle room. You’ll also need to cut two matching tail pieces. Freehand it or find a template online.
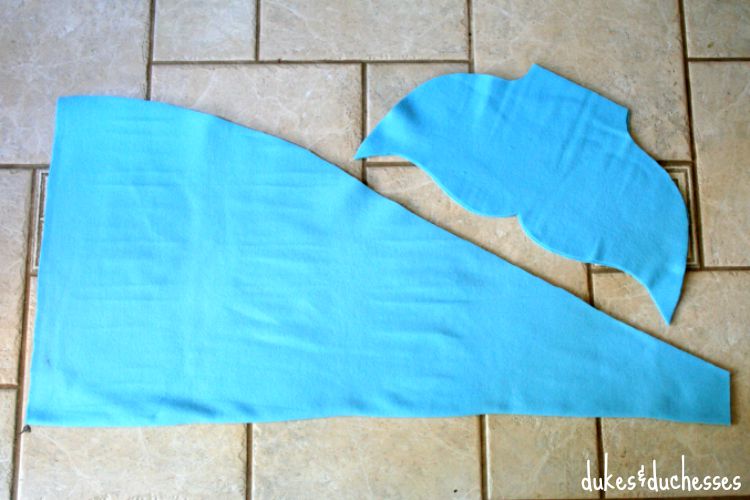
Stitch the long seam of the leg piece from top to bottom then press with the seam at the back.

Pin both tail pieces together and stitch around the edge, slipping the end of the leg piece in between the tail pieces, and stitching to attach.
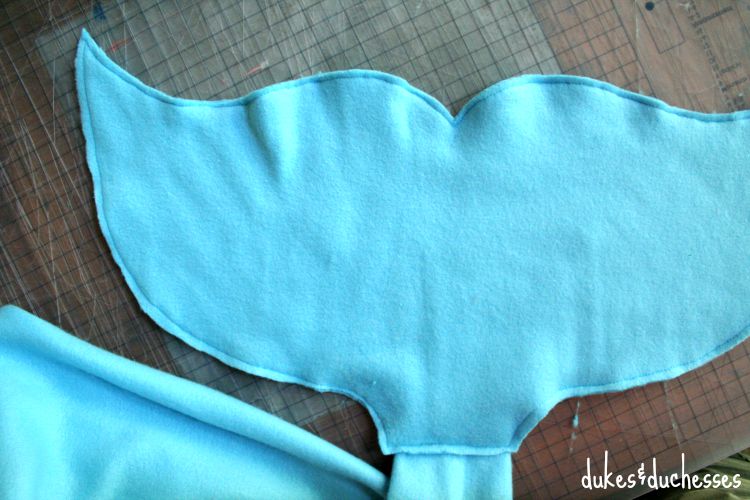
Fold over the top and stitch to create a hem, if desired, or stitch sparkly trim along the top edge like I did. I used two separate pieces of trim, laying sequined elastic over ruffled tulle. A mermaid can’t have too much bling, can she? {If your child will want to wear this more like a costume rather than a blanket, you may want to add elastic to a casing along the top.}

Embellish the tail piece as desired. I stitched more silver sequin trim onto the top of the tail …

… to give it a little flash.

That’s it! This adorable mermaid tail blanket is perfect for cuddling up in while watching TV or as a costume for imaginative play. Either way, your little one will love it!

Don’t want to make your own? Add a mermaid blanket {affiliate link} to the shopping cart and no one will be any wiser {wink}.


Awe, too much cuteness! What a fun idea for little girls.
You seriously come up with the cutest ideas!
Randi, that blanket is awesome!! My girls have been asking me a mermaid tail and this one would be great to to. Thanks for sharing!!
LOVE THIS! My daughter wants to grow up and be a mermaid and I did, too, when I was her age. Pinning this so I can make her one, either for Christmas or her birthday (which is shortly after Christmas). Thanks for including the tutorial!
Oh my goodness my daughter would love this!!! I’ll definitely have to pin this and have a go at making one. Thanks so much for sharing. Found you at Totally Terrific Tuesday link party.
this is absolutely adorable! my girls are mermaid obsessed, they would flip over these! Pinning this for xmas – think i need to make a few of these for them and my nieces! Thank you for sharing!!
This is to cute, my daughter would love it! Thanks for the easy instructions I think I could make this myself now. When you get a chance visit my blog. I am a stay at home mom of 5 also!
My daughter would love this! Thanks for the tutorial.
This is amazing, and I want one for myself! It’s totally fine for a 30 year old to use one of these right? I saw this on Foodie FriDIY 🙂
Oh my! This looks so amazing! Pinned and tweeted. We love partying with you and we appreciate you stopping by! Please take a minute to stop by next week, so we can pin and tweet your new creation. The party starts on Monday at 7 pm! Have a great Saturday! Lou Lou Girls
Wow, I just love this! My BFF’s family makes “swimable” mermaid tails, so this made me think of them. I wanted to let you know that I’m featuring this post tonight at the Create & Share Link Party (7:00 PM MST)! Congratulations!!! Can’t wait to see what you share with us this week. 🙂
Thank you for the tutorial! & great ideas! I started making these for my girls & granddaughters, still need to add some bling!