• Home
  • Start Here
    • About Dukes and Duchesses
    • Dukes and Duchesses Creative Holiday Gift Guide
    • Collaborate/Contact
    • Privacy Policy
  • Holidays
    • New Year’s Eve/Day
    • Valentine’s Day
    • leap year
    • St. Patrick’s Day
    • April Fool’s Day
    • Easter
    • May Day
    • cinco de mayo
    • Mother’s Day
    • Father’s Day
    • Fourth of July
    • Halloween/Harvest
    • Thanksgiving
    • Christmas
  • Crafts
    • general crafts
    • Cricut projects
    • printables
    • painting
    • sewing
    • knitting
  • DIY
  • Repurposed
  • Parties
    • Birthday
    • Entertaining
  • Recipes
  • Home Decor
    • Decor
    • home improvement
    • plants and garden
    • housekeeping
    • organization
  • travel
    • general travel
    • Dallas

Dukes and Duchesses

Dallas Fort Worth Creative Lifestyle Blogger

creative projects painting sewing Silhouette · Written by Randi Dukes

A Pool Rules Pillow

441shares
  • Tweet 51
  • Share

Every time I walk out to my pool, I smile at my new pillow.  You may have seen this Pool Rules pillow on Uncommon Designs a few weeks ago but in case you didn’t, I wanted to share the tutorial here as well!

a pool rules pillow

Last summer, I saw the cutest wood pool sign in the Pottery Barn catalog.  I fell in love with it and wanted to DIY it but I really don’t have a great spot to hang a sign by my pool.  Instead, I turned it into this bright pillow!

To make one, you’ll need a pillow form and a solid colored outdoor fabric cut to the measurements of your pillow.  I used a 14-inch pillow form and cut my fabric 14.5 inches by 34 inches.  To form an envelope pillow, you want to leave a small seam allowance on the sides and allow for an overlap of the closure at the back.

materials

When making homemade pillows, I almost always go with an envelope style.  It takes five minutes to stitch it up and is simple even for a beginning sewer.

For this project, I wanted to stencil the text first but needed to make sure it was centered properly so I used pins to mark where I’d fold the fabric when I stitched it up.

markings for stencil placement

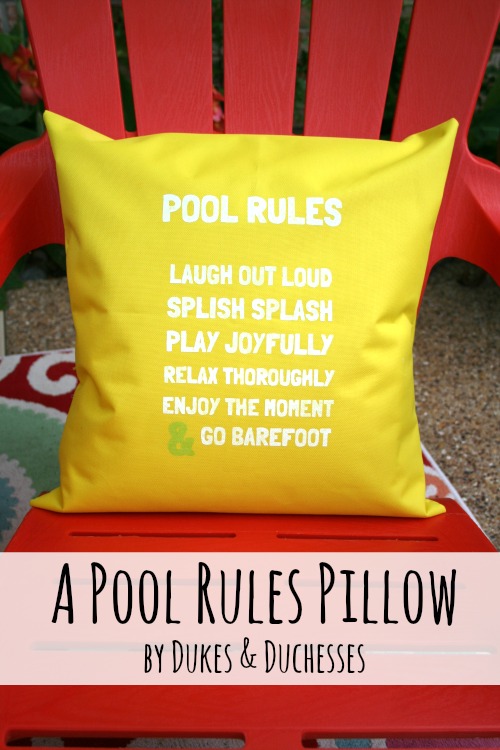
I used my cutting machine to make a stencil out of vinyl, copying the text from the Pottery Barn sign.

stencil

I centered it on the fabric and painted through the stencil with outdoor paint that can withstand the elements {I used Patio Paint by DecoArt}.  A word of caution: be sure to use a dabbing/pouncing technique with just a bit of paint on your brush or pouncer so paint won’t seep under the stencil.  I kept adding more and more paint until the letters were filled in but just did a light coat on the brush each time.

painted stenciled fabric

I used white paint so it would show well against the fabric but added a fun colored ampersand at the bottom.

painted letters

Once the paint was dry, I was ready to stitch up the pillow.  You’ll want to finish the short edges of the fabric.  I serged one end, folded it under, and stitched it but left the other selvage edge plain.  I love shabby and I decided to use the selvage edge rather than cover it up.

finished pillow edges

Fold the top down, then fold the bottom up and stitch both sides.  Remember that whatever edge is on the inside is the edge that will show on the outside when you flip it right side out.  Turn the pillow right side out, push out the corners, and insert the pillow form.

envelope pillow

This colorful pillow fits perfectly with the bright sitting area I have next to the pool and I love that it adds a bit of warmth and comfort to that space.

outdoor pillow

This is where you’ll be able to find me for much of the summer, reading a book, sipping on some iced tea, and watching my kids swim in the pool.

outdoor living space

To see more of this outdoor space, be sure to check out my DIY umbrella table and my terracotta pot table!


1 Comment

About Randi Dukes

I’m Randi, a Dallas-based mom of five kids, ranging from third grade to college and including a set of twins. I love strong coffee, craft and DIY projects, my planner, and my big ol’ family. When I’m not creating something for my blog, I can be found in the car, running kids from one place to another. I’m the one knitting at the red light. Connect with me on google+ | twitter | facebook

« A Pampering Spa-Themed Girls’ Night In
65 Ways to Entertain Kids on a Road Trip »

Comments

  1. Megan @ Our Pinteresting Family says

    June 26, 2014 at 10:42 am

    Super cute!

    Reply

Leave a Reply Cancel reply

Your email address will not be published. Required fields are marked *

  • Facebook
  • Instagram
  • Pinterest
  • Twitter
  • YouTube

Welcome to Dukes & Duchesses!

Square profile photo

I’m Randi, a mom of five living in Dallas. I love strong coffee, long lists, bright colors, thrift stores, repurposed junk, and power tools.

Want to collaborate?

Click Here!

teeth brushing chart

Vinyl Teeth Brushing Mirror Chart for Kids

colorful fabric sign for thanksgiving

Happy Thankstuffing Fabric Sign Made with the Cricut Maker

customized DIY cloth napkins

Custom Cloth Napkins Made with the Cricut EasyPress

floral drawer sachet filled with scented rice

Tea Bag Drawer Sachets {a Stitched Version and a No-Sew Version}

succulent planting party food bar

Succulent Planting Party

Dukes and Duchesses is a participant in the Amazon Services LLC Associates Program, an affiliate advertising program designed to provide a means for sites to earn advertising fees by advertising and linking to Amazon.com.
Any content on this website is created for inspirational purposes only. You assume your own risk for using any methods, tools, or supplies suggested here. Follow proper guidelines for every tool or supply used and obtain professional guidance as needed.

Copyright © 2021 · Randi Dukes · Wordpress Hosting by SERVOUSLY

Copyright © 2021 · Divine Theme on Genesis Framework · WordPress · Log in