• Home
  • Start Here
    • About Dukes and Duchesses
    • Dukes and Duchesses Creative Holiday Gift Guide
    • Collaborate/Contact
    • Privacy Policy
  • Holidays
    • New Year’s Eve/Day
    • Valentine’s Day
    • leap year
    • St. Patrick’s Day
    • April Fool’s Day
    • Easter
    • May Day
    • cinco de mayo
    • Mother’s Day
    • Father’s Day
    • Fourth of July
    • Halloween/Harvest
    • Thanksgiving
    • Christmas
  • Crafts
    • general crafts
    • Cricut projects
    • printables
    • painting
    • sewing
    • knitting
  • DIY
  • Repurposed
  • Parties
    • Birthday
    • Entertaining
  • Recipes
  • Home Decor
    • Decor
    • home improvement
    • plants and garden
    • housekeeping
    • organization
  • travel
    • general travel
    • Dallas

Dukes and Duchesses

Dallas Fort Worth Creative Lifestyle Blogger

creative projects Cricut · Written by Randi Dukes

No Sew Appliqued Pillow Made with the Cricut Explore Air 2

340shares
  • Tweet 14
  • Share

This is a sponsored conversation written by me on behalf of Cricut and this post contains affiliate links. The opinions and text are all mine.

I love pops of color in my home, handmade items, and toss pillows … and this week I combined all three in a colorful no sew appliqued pillow made with my Cricut Explore Air 2!

no sew appliqued pillow made with the cricut explore air 2

To make this no-sew appliqued pillow, I used a pre-made chevron pillow cover from my local craft store and colorful patterned fabric scraps from my stash.

fabric scraps and pillow cover

I created the applique using Cricut Design Space.

I downloaded a simple house image first and hid every layer except the most basic one.  For a cute and whimsical touch, I used the insert shapes command and added hearts to create smoke coming out of the chimney.  I created them in two different sizes and simply duplicated them so I had four.

house image with heart smoke in chimney

I wanted to add text in the middle of the house but didn’t want to lay it over so I sliced the image instead.  To do this, I inserted a square and unlocked it so I could stretch it into a rectangle.  I placed it where I wanted it over the house then selected both the house and the rectangle and used the slice command. 

how to split a cricut image

Once it was sliced, I simply moved the rectangle away and deleted it.

how to slice an image in cricut design space

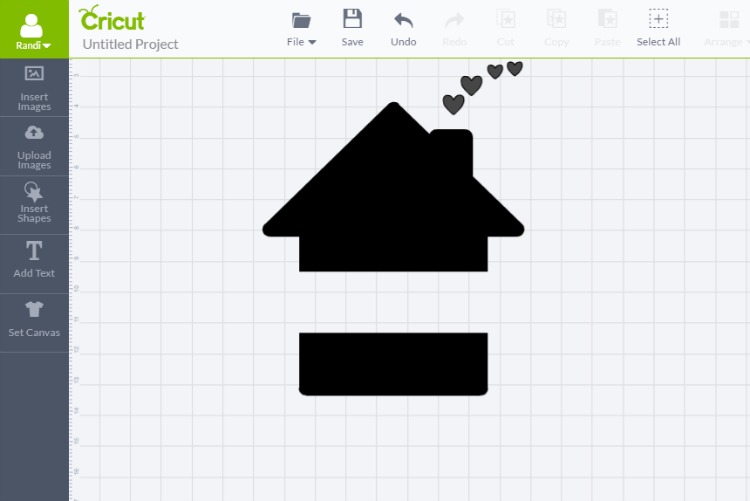
I filled that space with the text and unlocked the text so I could fit it into that space.

home image on cricut design space

Once I had the image the way I wanted it, I fused heat and bond to the back of the fabric pieces and prepared to cut.

I used the strong grip cutting mat and set the Cricut Explore Air 2 dial to custom then selected a fabric setting.

cutting fabric with cricut explore air 2

I cut the pieces and then used a hot iron {with no steam} to adhere the pieces to the pillow cover.

home applique on pillow cover

I love all the color on this pillow …

colorful appliqued pillow

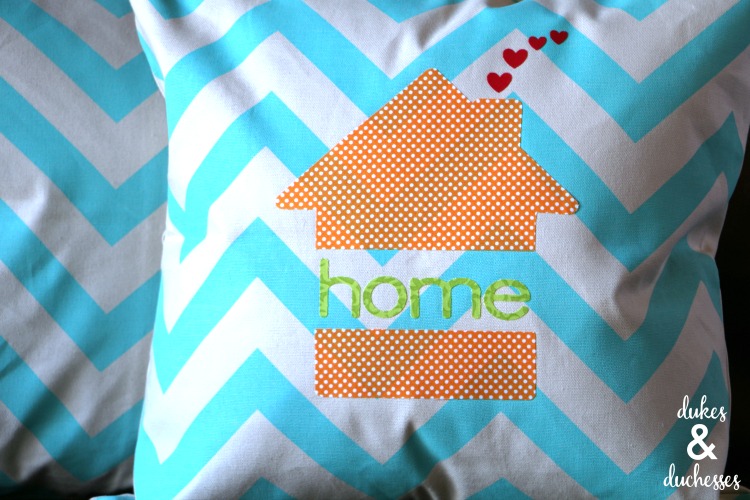
… and it adds a fun bit of whimsy to our family room and some bright color to our huge, dark leather sectional.

DIY no sew appliqued home pillow

I’d like to make some more appliqued pillows for a bit of a change for spring and summer and I’d love to make some seasonal accessories too.

colorful toss pillows for the home

What have you been creating with your Cricut?

For more easy projects that you can make with the Cricut Explore Air 2, be sure to check out this cute mug idea for a tea lover …

tea lovers mug

… a wood veneer floral wreath …

wood veneer floral wreath made with cricut explore air 2

… and a monogrammed popsocket that teens and tweens will love!

monogrammed popsocket made with cricut explore air 2


About Randi Dukes

I’m Randi, a Dallas-based mom of five kids, ranging from third grade to college and including a set of twins. I love strong coffee, craft and DIY projects, my planner, and my big ol’ family. When I’m not creating something for my blog, I can be found in the car, running kids from one place to another. I’m the one knitting at the red light. Connect with me on google+ | twitter | facebook

« Tea Lovers Mug
Wrapping Up January »
  • Facebook
  • Instagram
  • Pinterest
  • Twitter
  • YouTube

Welcome to Dukes & Duchesses!

Square profile photo

I’m Randi, a mom of five living in Dallas. I love strong coffee, long lists, bright colors, thrift stores, repurposed junk, and power tools.

Want to collaborate?

Click Here!

teeth brushing chart

Vinyl Teeth Brushing Mirror Chart for Kids

colorful fabric sign for thanksgiving

Happy Thankstuffing Fabric Sign Made with the Cricut Maker

customized DIY cloth napkins

Custom Cloth Napkins Made with the Cricut EasyPress

floral drawer sachet filled with scented rice

Tea Bag Drawer Sachets {a Stitched Version and a No-Sew Version}

succulent planting party food bar

Succulent Planting Party

Dukes and Duchesses is a participant in the Amazon Services LLC Associates Program, an affiliate advertising program designed to provide a means for sites to earn advertising fees by advertising and linking to Amazon.com.
Any content on this website is created for inspirational purposes only. You assume your own risk for using any methods, tools, or supplies suggested here. Follow proper guidelines for every tool or supply used and obtain professional guidance as needed.

Copyright © 2021 · Randi Dukes · Wordpress Hosting by SERVOUSLY

Copyright © 2021 · Divine Theme on Genesis Framework · WordPress · Log in