• Home
  • Start Here
    • About Dukes and Duchesses
    • Dukes and Duchesses Creative Holiday Gift Guide
    • Collaborate/Contact
    • Privacy Policy
  • Holidays
    • New Year’s Eve/Day
    • Valentine’s Day
    • leap year
    • St. Patrick’s Day
    • April Fool’s Day
    • Easter
    • May Day
    • cinco de mayo
    • Mother’s Day
    • Father’s Day
    • Fourth of July
    • Halloween/Harvest
    • Thanksgiving
    • Christmas
  • Crafts
    • general crafts
    • Cricut projects
    • printables
    • painting
    • sewing
    • knitting
  • DIY
  • Repurposed
  • Parties
    • Birthday
    • Entertaining
  • Recipes
  • Home Decor
    • Decor
    • home improvement
    • plants and garden
    • housekeeping
    • organization
  • travel
    • general travel
    • Dallas

Dukes and Duchesses

Dallas Fort Worth Creative Lifestyle Blogger

creative projects travel · Written by Randi Dukes

DIY Pressed Souvenir Penny Bracelet

2370 shares
  • Tweet159
  • Share116

We just got back from a trip to Disney World and while we were there we used our pennies in the pressed penny machines all over the park.  I thought it would be fun to turn our penny souvenirs into a wearable keepsake.  This DIY pressed souvenir penny bracelet is really easy to make and it’s a great way to remember a special trip or outing!

DIY pressed souvenir penny bracelet

To make a bracelet, you’ll need leather cording, crimps, jump rings, and a clasp.  I opted for bronze fixings to match the penny but any color will look good.  You’ll also need pressed pennies.  The Disney parks and many other amusement parks have pressed penny machines.  For a penny plus fifty cents, you can leave with a character or logo imprinted on a flattened penny.  It’s a super cheap way to get a souvenir.

supplies for souvenir coin bracelet

Start by drilling holes in both sides of the penny.  I used a drill bit the same width as the leather cording.  Hold the penny firmly in place while drilling {and don’t forget your safety goggles}.

pressed souvenir coin from disney

Thread the leather cord through each hole …

drilled coin with leather cord

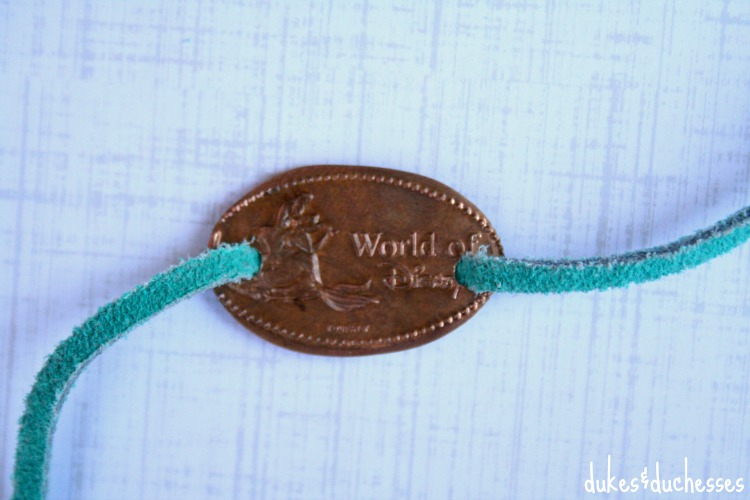
… so that the leather sits on the back of the coin and protrudes from the front of the coin on each side.

leather cord for souvenir coin bracelet

Using needlenose pliers, squeeze a crimp tightly onto each end of the leather cord.  Be sure the length of the cord is correct first, taking into allowance the extra length the fixings will add.

crimped ends of cord for bracelet

Add a jump ring to each crimp and add a clasp to one side.

copper fixings for pressed coin bracelet

With just five minutes of work and less than five dollars of supplies, you’ve got a fun and personal souvenir that will remind you of a special day or the trip of a lifetime!

pressed souvenir coin bracelet


Leave a Comment

About Randi Dukes

I’m Randi, a Dallas-based mom of five kids, ranging from third grade to college and including a set of twins. I love strong coffee, craft and DIY projects, my planner, and my big ol’ family. When I’m not creating something for my blog, I can be found in the car, running kids from one place to another. I’m the one knitting at the red light. Connect with me on google+ | twitter | facebook

« Southwest Chicken Salad Recipe
21 DIY Dog Beds »

Leave a Reply Cancel reply

Your email address will not be published. Required fields are marked *

  • Facebook
  • Instagram
  • Pinterest
  • Twitter
  • YouTube

Welcome to Dukes & Duchesses!

Square profile photo

I’m Randi, a mom of five living in Dallas. I love strong coffee, long lists, bright colors, thrift stores, repurposed junk, and power tools.

Want to collaborate?

Click Here!

teeth brushing chart

Vinyl Teeth Brushing Mirror Chart for Kids

colorful fabric sign for thanksgiving

Happy Thankstuffing Fabric Sign Made with the Cricut Maker

customized DIY cloth napkins

Custom Cloth Napkins Made with the Cricut EasyPress

how to cut aluminum cans with cricut explore air 2

Upcycled Fall Wreath Made with Aluminum Cans

DIY monogrammed stockings

Monogrammed Placemat Stockings Made with the Cricut Explore Air 2

Dukes and Duchesses is a participant in the Amazon Services LLC Associates Program, an affiliate advertising program designed to provide a means for sites to earn advertising fees by advertising and linking to Amazon.com.
Any content on this website is created for inspirational purposes only. You assume your own risk for using any methods, tools, or supplies suggested here. Follow proper guidelines for every tool or supply used and obtain professional guidance as needed.

Copyright © 2022 · Randi Dukes · Wordpress Hosting by SERVOUSLY

Copyright © 2022 · Divine Theme on Genesis Framework · WordPress · Log in