• Home
  • Start Here
    • About Dukes and Duchesses
    • Collaborate/Contact
    • Privacy Policy
  • Holidays
    • New Year’s Eve/Day
    • Valentine’s Day
    • leap year
    • St. Patrick’s Day
    • April Fool’s Day
    • Easter
    • May Day
    • cinco de mayo
    • Mother’s Day
    • Father’s Day
    • Fourth of July
    • Halloween/Harvest
    • Thanksgiving
    • Christmas
  • Crafts
    • general crafts
    • Cricut projects
    • printables
    • painting
    • sewing
    • knitting
  • DIY
  • Repurposed
  • Parties
    • Birthday
    • Entertaining
  • Recipes
  • Home Decor
    • Decor
    • home improvement
    • plants and garden
    • housekeeping
    • organization
  • travel
    • general travel
    • Dallas

Dukes and Duchesses

Dallas Fort Worth Creative Lifestyle Blogger

creative projects Silhouette · Written by Randi Dukes

A DIY Tooth Fairy Box

33 shares
  • Tweet4
  • Share

This is a post sponsored by Silhouette America.  All thoughts and opinions are my own.  This post contains affiliate links.

I have a fun {and glittery} DIY tooth fairy box to show you today.  It’s a simple DIY made with chipboard and a pile of glitter and it’s a really cute way to leave a tooth out for the tooth fairy!  You can customize it with any color of glitter to match room decor or coordinate with a child’s favorite color.

DIY tooth fairy box

If you haven’t used chipboard or kraft board before, it’s a must-have in the craft arsenal.  It offers a stability that cardstock doesn’t have and is perfect for making boxes.

This project was made on a Silhouette but can also be made on a Cricut machine.  The scoring wheel on the Cricut is perfect for making boxes and if you haven’t used the Cricut scoring wheel before, be sure to check out this post that tells you everything you need to know about the scoring wheel.

How to Make a Tooth Fairy Box

Ready to tackle this cute little tooth fairy box?

I downloaded a template from the Silhouette store and cut it from the chipboard.  I love the scalloped edges on this lid.  If you’re using a Cricut to make this project, find a box image in Cricut Design Space and size it to make it small and cute.

tooth fairy

I used hot glue to glue the tabs on the box together …

tooth fairy

… and then covered the lid in mod podge and shook fine glitter {Martha Stewart fine glitter is my favorite} all over it.  

Once the glitter layer was dry, I covered it again in matte mod podge so the glitter won’t fall off every time the box is touched.  I added a little white cardstock paper tooth {also cut with the cutting machine} to the top and now this little box is all ready for the next lost tooth.
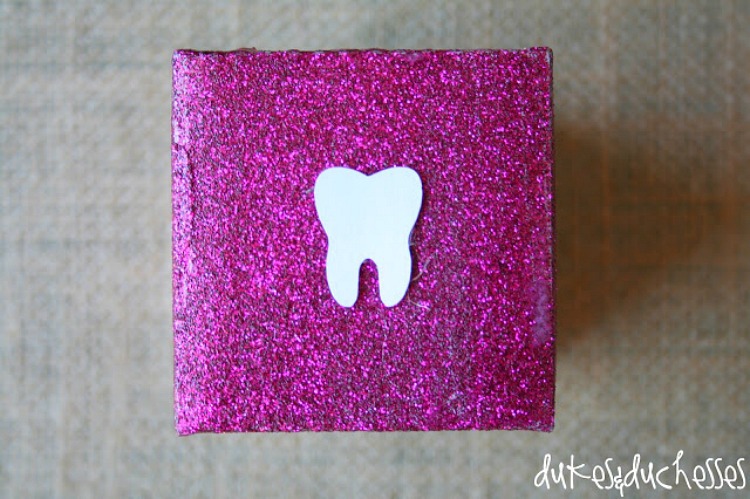
glitter tooth fairy box
Which has already happened.  Sometimes I think my kids pull out their teeth and use them as a source of income {wink}.

tooth fairy

Simple, huh?  What tooth fairy wouldn’t love to find a tooth in a glittery little box on the nightstand?  There’s even enough room in the box for a little note from the child or from the tooth fairy.

And I have it on good authority that the tooth fairy loves the convenience of a box … digging under the pillow of a sleeping child gets tiresome after a while {wink}.

tooth fairy

For another cute way to leave a tooth for the tooth fairy, be sure to check out this adorable tooth fairy pillow!

tooth fairy pillow


4 Comments

About Randi Dukes

I’m Randi, a Dallas-based mom of five kids, ranging from third grade to college and including a set of twins. I love strong coffee, craft and DIY projects, my planner, and my big ol’ family. When I’m not creating something for my blog, I can be found in the car, running kids from one place to another. I’m the one knitting at the red light. Connect with me on google+ | twitter | facebook

« Mint Lemonade Iced Tea Recipe
10+ Ideas to Celebrate Graduation »

Comments

  1. Our Pinteresting Family says

    May 8, 2013 at 11:56 am

    So cute, Randi! I’m going to have to give that chipboard a try. 🙂

    Reply
  2. [email protected] says

    May 8, 2013 at 12:44 pm

    Cutest thing ever! 🙂 Love how you used the glitter on the lid.

    Reply
  3. Shannah @ Just Us Four says

    May 8, 2013 at 5:31 pm

    Ok, I absolutely have to make something like this now! My daughter {5 1/2…the 1/2 is super important!} is about to lose her first tooth and I am so ill prepared for the tooth fairy’s visit. This will be perfect and won’t take forever to make 🙂

    Reply
  4. Jennifer - The Deliberate Mom says

    May 8, 2013 at 7:40 pm

    Awwww – that’s the cutest little box I’ve ever seen.

    Good work!

    Reply

Leave a Reply Cancel reply

Your email address will not be published. Required fields are marked *

  • Facebook
  • Instagram
  • Pinterest
  • Twitter
  • YouTube

Welcome to Dukes & Duchesses!

randi dukes

I’m Randi, a mom of five living in Dallas. I love strong coffee, long lists, bright colors, thrift stores, repurposed junk, and power tools.

how to plant a sweet tea garden

Southern Sweet Tea Container Garden

colorful wood DIY garden marker

DIY Wood Veneer Plant Markers

creative outdoor garden ideas

8 Creative Ideas for Your Outdoor Garden

DIY herb garden markers

DIY Upcycled Knife Garden Markers

upcycled cutting board sign in beverage garden

DIY Beverage or Cocktail Garden

Dukes and Duchesses is a participant in the Amazon Services LLC Associates Program, an affiliate advertising program designed to provide a means for sites to earn advertising fees by advertising and linking to Amazon.com.
Any content on this website is created for inspirational purposes only. You assume your own risk for using any methods, tools, or supplies suggested here. Follow proper guidelines for every tool or supply used and obtain professional guidance as needed.

Copyright © 2025 · Randi Dukes · Wordpress Hosting by SERVOUSLY