• Home
  • Start Here
    • About Dukes and Duchesses
    • Collaborate/Contact
    • Privacy Policy
  • Holidays
    • New Year’s Eve/Day
    • Valentine’s Day
    • leap year
    • St. Patrick’s Day
    • April Fool’s Day
    • Easter
    • May Day
    • cinco de mayo
    • Mother’s Day
    • Father’s Day
    • Fourth of July
    • Halloween/Harvest
    • Thanksgiving
    • Christmas
  • Crafts
    • general crafts
    • Cricut projects
    • printables
    • painting
    • sewing
    • knitting
  • DIY
  • Repurposed
  • Parties
    • Birthday
    • Entertaining
  • Recipes
  • Home Decor
    • Decor
    • home improvement
    • plants and garden
    • housekeeping
    • organization
  • travel
    • general travel
    • Dallas

Dukes and Duchesses

Dallas Fort Worth Creative Lifestyle Blogger

creative projects repurposed · Written by Randi Dukes

Recycled Art Notecards

111 shares
  • Tweet2
  • Share

This recycled art notecards post contains affiliate links.

Do your kids love to paint and draw and color?  And do you have piles of artwork lying around?  There’s only so much you can do with all that artwork and it typically gets dumped in the garbage at my house.  I decided to save some of it and use it to make really simple recycled art notecards to send to friends and family on birthdays.

recycled art notecards

Every year , almost without fail, I make a large stack of simple cards to mail out to friends and family on their birthdays. This year, I decided to recycle and reduce some of the clutter in our house and use the kids’ paintings to make the cards.  After all, who else appreciates the artwork of children like grandparents, aunts, and uncles?

How to Make Recycled Art Notecards

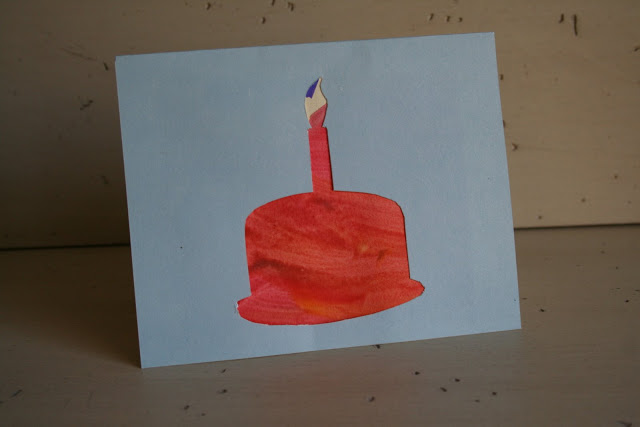
To make the cards, I used colorful cardstock, a stencil with birthday shapes, and a craft knife.

I folded the cardstock into cards {you can use a scoring tool to make that easier or buy pre-folded cards} and used the craft knife and the stencil to cut shapes out of the front of the card.  Before cutting be sure to open the cards, lay them flat, and place the area on a cutting mat.

Once the shape is cut on the front of the card, cut a small square out of the artwork and tape or glue it to the inside of the card, covering the cut space.
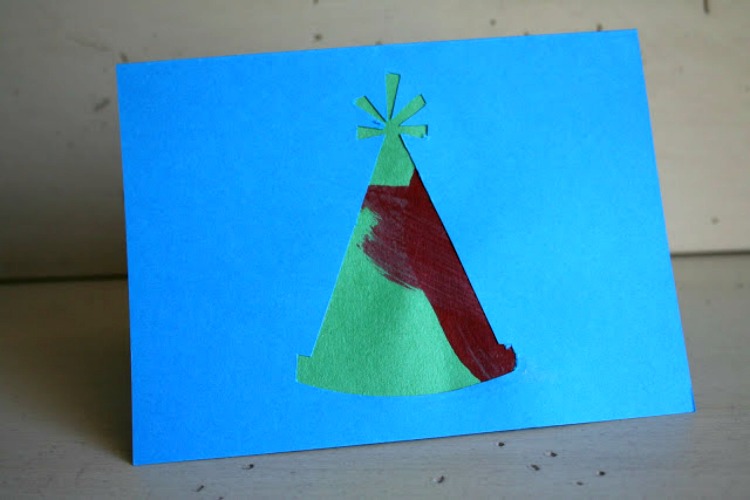
how to recycle artwork

Mix and match different colored cards with different artwork and before you know it you’ll have a whole stack of custom, recycled cards!

Altered art

What have you made with your child’s artwork?

For more clever ways to recycle and reuse your child’s artwork, be sure to check out these nine ways to repurpose art!
9 ways to repurpose art


7 Comments

About Randi Dukes

I’m Randi, a Dallas-based mom of five kids, ranging from third grade to college and including a set of twins. I love strong coffee, craft and DIY projects, my planner, and my big ol’ family. When I’m not creating something for my blog, I can be found in the car, running kids from one place to another. I’m the one knitting at the red light. Connect with me on google+ | twitter | facebook

« Spread Love Butter Knives
Magnetic Chalk Board Tree »

Comments

  1. "bigcanadiangirl" says

    January 7, 2010 at 10:34 pm

    Those are super cute – heck you could sell those.

    Reply
  2. Amanda says

    January 7, 2010 at 11:10 pm

    Wonderful idea! You could use a Sissix or Cricut to speed up the process. If you don’t have one of those, I think the die cut machine at Teacher’s Tools is free to use.

    Reply
  3. Linda says

    January 8, 2010 at 12:24 am

    Super cute! Can’t wait til one hits my mail box 🙂 heehee

    Reply
  4. Elizabeth says

    January 8, 2010 at 4:05 am

    Hmmm, could work in chapter 17: creating the perfect card. But could also work really well in chapter 49: reducing your carbon footprint. I’m not sure; still tossing it around. Either way, another GREAT addition!

    Reply
  5. Maureen says

    January 8, 2010 at 4:20 am

    Those are beautiful! I am sure the recipients are most grateful.

    Thanks for the encouraging words – today was better. Not great, but better.

    Reply
  6. Emily says

    January 8, 2010 at 1:39 pm

    I LOVE this idea. The cards turned out great.

    Reply
  7. barb says

    January 8, 2010 at 8:21 pm

    Very cute and fabulous idea!

    Reply

Leave a Reply Cancel reply

Your email address will not be published. Required fields are marked *

  • Facebook
  • Instagram
  • Pinterest
  • Twitter
  • YouTube

Welcome to Dukes & Duchesses!

randi dukes

I’m Randi, a mom of five living in Dallas. I love strong coffee, long lists, bright colors, thrift stores, repurposed junk, and power tools.

how to plant a sweet tea garden

Southern Sweet Tea Container Garden

colorful wood DIY garden marker

DIY Wood Veneer Plant Markers

creative outdoor garden ideas

8 Creative Ideas for Your Outdoor Garden

DIY herb garden markers

DIY Upcycled Knife Garden Markers

upcycled cutting board sign in beverage garden

DIY Beverage or Cocktail Garden

Dukes and Duchesses is a participant in the Amazon Services LLC Associates Program, an affiliate advertising program designed to provide a means for sites to earn advertising fees by advertising and linking to Amazon.com.
Any content on this website is created for inspirational purposes only. You assume your own risk for using any methods, tools, or supplies suggested here. Follow proper guidelines for every tool or supply used and obtain professional guidance as needed.

Copyright © 2025 · Randi Dukes · Wordpress Hosting by SERVOUSLY