This color washed effect post contains affiliate links.
I’ve been working on a few DIY projects and yesterday, while painting wood for a project, I wondered if you all know how easy it is to create a color washed effect on wood. This idea is so simple that I almost didn’t share it here but if you haven’t ever color washed wood, I don’t want you to miss out on this easy paint technique. It’s a really great way to get a completely different look.

Creating a color washed effect is very simple and doesn’t require any special supplies.
Supplies for Creating a Color Washed Effect
To create this effect, you’ll need craft paint or any water based paint and a thick paint brush or a foam brush. You’ll also need access to water.
Because this technique doesn’t require a lot of paint, if you’re doing a small surface, a small container of craft paint is more than enough.
How to Create a Color Washed Effect with Paint
Using the thick paint brush or foam brush, dab paint onto the wood, spacing the dabs out a bit.
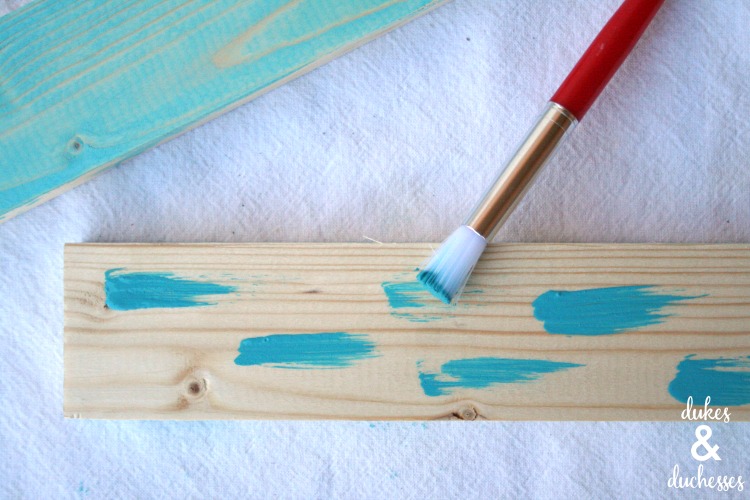
Wet the paint brush well with clean water and brush over the paint dabs and the wood, wetting the brush as needed until the board is covered with color. You can alter how dark or light the washed paint is by the amount of water you use.
If the paint gets too watered down, just add more dabs of paint and continue with the technique, blending the colors together with more water.
Apply as much or as little water as you need to get the washed effect you want.

You can also wipe the board down with a paper towel to get rid of excess water and paint and to remove any bubbles that occur on the surface of the wood.
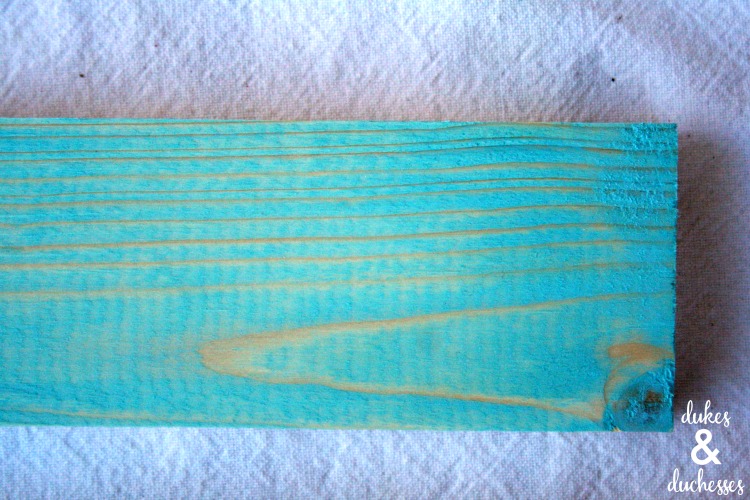
Let the wood dry completely and cover with a protective coating, if desired.
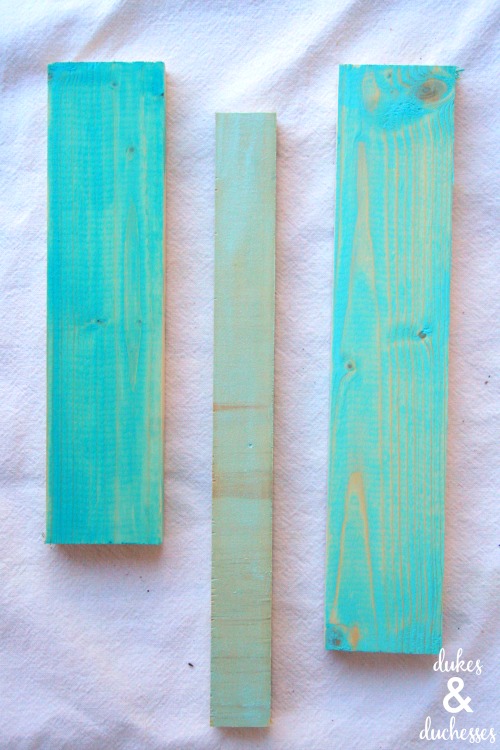
This color wash is a super simple paint technique but I love the final washed look and the way the grain of the wood continues to show through it.
Have you ever tried a color washed effect?


I love the washing effect on wood! So pretty. Love your projects and tutorials, no matter how simple they seem sometimes it’s good to remember the simple things 🙂
Agree!,,😊👍
I as a Activity Coordinator for 51 residents, I am always looking for idea’s for their wood crafting activity. Ty
What if the wood panel white and you what to color wash it
You can still use the same technique but it will depend what’s on it and whether the wash will soak in. If it’s white because it’s coated with a glossy paint, the wash won’t absorb into it. You may have to experiment a bit.
I can’t find a way to COMMENT.
I have been watering down water based paints most of my life. I experiment until I get the color that I want.
Super easy!
This is so stinking cute!!
I’ve been thinking about building a sandbox for my son this summer, and I think this would make an adorable border!! Thank you so much for sharing <3
I love this look! Thanks for sharing!
I haven’t tried this, but I will now! I love this looks and how beachy it looks! Thanks for posting. Pinning!
I love the color washing effect. Great tutorial! I found you at Creat Link Inspire party.
Does the colour come off when you touch it , does it stain your hand ? Would it be a good idea to put a coat of transparent varnish on it ?
Thanks for showing how to do this , I had been wanting to use water colour on wood , this showed me the way. ?
It’s just like stain at the end so once dry, it doesn’t come off at all. You could definitely varnish it if you wanted to add a protective coating.
Have you ever painted driftwood? I’ve been searching for hours for info or tutorials that discuss specific paint type, etc. Any suggestions?
I haven’t painted driftwood. Do you want to color it or stain it? Could you use chalk paint?
DRIFTWOOD CAN BE PAINTED WITH ACRYLIC WASH, WITH CHALK PAINT YOU MIGHT NEED MORE BUT YES UT WORKS. YOU CAN CHOOSE TO PUT FINISH ON OR NOT. SOMETIMES PEOPLE BLEACH THE WOOD BUT I MYSELF DONT.
Do you have a favorite varnish? I’ll be using this technique for some small craft items.
I usually use Minwax polyurethane or a spray on varnish/polyurethane by Rustoleum.
Glenna, I use MinWax’s Polycrylic clear sealer, (it applies easily with a brush, dries quick because it’s water based, and gives a lot of protection); it comes in matte, or semi-gloss finishes. Or you can use paste wax like Johnson & Johnson’s floor wax and seal your piece that way – which is what you use to seal chalk painted items. You apply the wax sparingly, and follow by buffing with a clean dry rag. Depends on your personal preference of the finished look.
Great tutorial! I always thought you used a dry brush technique so this was interesting to learn. Visiting from Create It Thursday.
Awesome! I have tried this before, but I don’t do it enough, love it!
Ah I was looking for this. Luckily found this on your blog. Hope I am able to do it easily. The water marks on my table don’t look good.
Will this work on old white wood windows.
It will as long as there’s nothing that’s sealing the wood like a polyurethane, paint, or something similar.
THEY CAN ALWAYS JUST BUFF/SAND IT FIRST RIGHT? LIKE EVEN IF THERE IS A SEALANT, AND THEN IT SHOULD WORK JUST THE SAME…. I MEAN I WOULD ASSUME….WOULD YOU AGREE?
Yes, as long as the sealant hasn’t soaked into the wood. That would affect the way the wood can absorb the color wash.
Can’t wait to try this, especially as I just priced “milk paint” at $19 a can, and I need 6 colors for a project that is going to be donated to a charity as a raffle item! I’ll let you know how it came out!
Love the look so far! I took pictures but I don’t see an easy way to post them in the comment space. Whether or not I can actually complete the project is another story! Hopefully I’ll have figured out a way to add the pictures by then !
Share the photos on the Dukes and Duchesses facebook page! I’d love to see it.
What is the name of the color you used. I’m doing my kitchen in aqua, and that looks like it would go great with it.
What color did you use and what paint brand
What color is this?
I’m not sure exactly what color I used … it’s a craft paint from DecoArt and an aqua color but I don’t know the exact one. Sorry!
Peacock blue or peacock real if that’s not correct then it’s the ocean blue or ocean teal… I just emptied all four of those on a peacock’s gone wild all over my bed room furniture… brands that have similar names and like color are anita’s and the decorate Americana hobby lobby and Michael’s….hope this helps I use that color so much I knew it immediately
How long did it take to dry? I want to add a stencil on top w reg white paint
The dry time will depend on how wet your wash is but it dries in about the same amount of time that paint does.
Can you water down an acrylic paint to get this effect?
Yes! Most craft paints are acrylic and this works perfectly with craft paint.
Yes. That is the way it is commonly done so you don’t risk splotches.
I stained my boards first. Do you think I could get this same effect on the board using a chalk paint?
You could get something similar if you really watered down the chalk paint. It probably won’t absorb through the stain the same way but you could likely achieve that streaky watered down look.
I did something similar to an old book case but I added water to the paint then bushed it on. You can still see some wood and the grain of the wood through it. I love how it turned out.
Will this work with “treated” boards?
It will to a degree. Usually a treated board will allow some color to seep in but often it affects the clarity of the color.
Hi Randi,
Firstly, thank you so much for posting this tutorial!! I have wanted to do this for a couple of years. I tried doing it couple of times but I could never get specific look I was chasing. The two major obstacles were; #1- I wasn’t satisfied with the finished product; #2 – I didn’t know what the technique was called so my searches never delivered the desired effect.
You have put an end to fruitless and frustrating searches and now I can feel confident I will be able to see the desired outcome!!! Thank you again!!
This looks incredible. I found a color treatment I’d like to replicate on natural plywood — sky blue and whitewashed wood grain. Do you have any suggestions for how I can accomplish the white and blue while still allowing the wood grain to show through?
I would first test on a small piece of plywood. I would do the white first, whitewash as per the instructions in this post, let it dry completely, then add the blue over top. The less water the better with the blue so you don’t disturb the white. Not sure it will work but it’s worth a try.
I want to do a multi color stained look on a butcher block desk. Bright colors, pretty stained look. I’m not sure where to start.
I love that idea but I think you’ll have to make a bit of a plan first so it doesn’t end up just a mess. If you overlap the colors too much, I think you might end up with a brown puddle. I would kind of map out where you want the colors and do one color at a time and let it fully dry before doing the next.
♥️Curious minds 🤯🤷♀️ As for changing colors I would definitely make a plan…. but I think tape could help…that way you could use the tape to separate the colors…. then after it dries you could remove tape and have that small area to blend colors….but practice blending on similar wood maybe a scrap piece to make sure the color blend, blends the way you want! I think 🤔 💭 this may help…. I just saw taping being a huge help to get your desired look♥️
I love this idea! I have a small wooden bench I’m trying this on. Thanxs!
Nice project! I will try this method for a wooden wardrobe I just bought. However, the wood of the wardrobe is not smooth but coarse. I was wondering if it is then necessary to sand the surface first? Do you have any tips?
I would probably recommend sanding it first. I think it will give you a better looking finish once you color wash it.